Google Gemini Nano Banana trend: turn photos into 3D-look anime figurines with smart prompts
 Sep, 16 2025
The internet’s new obsession: a 10-second “figurine” that looks hand-crafted
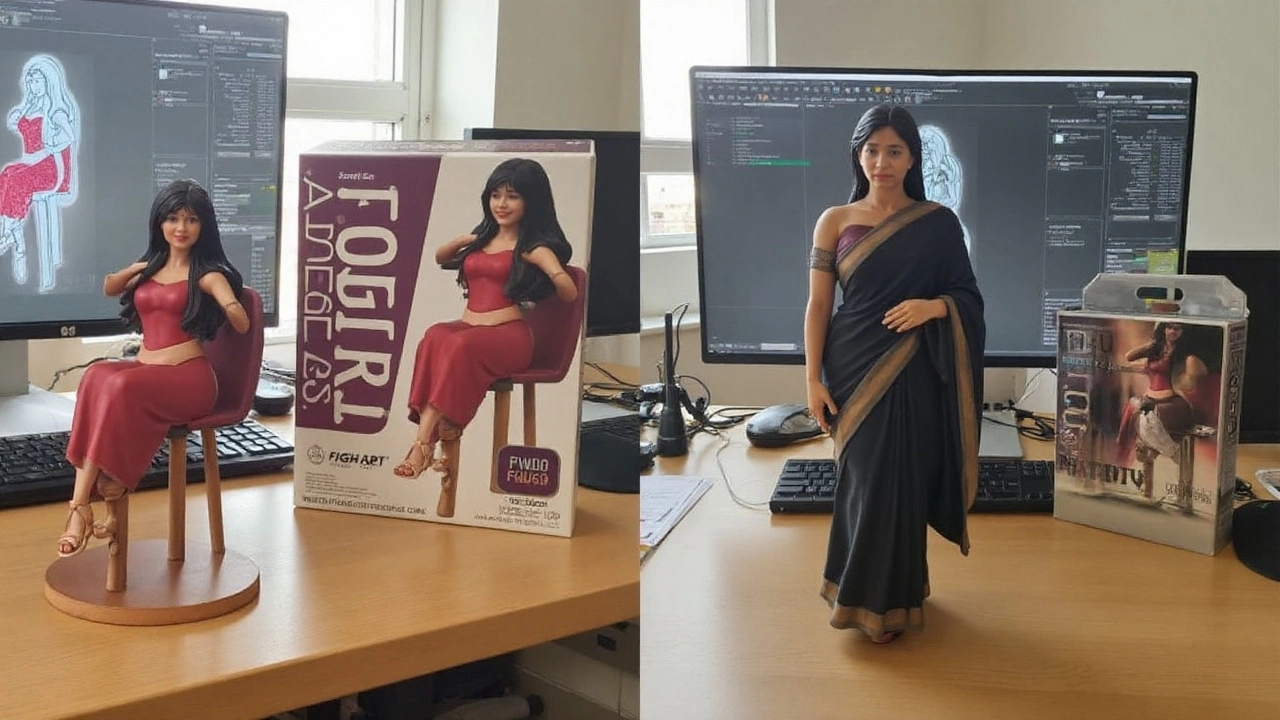
Scroll your feed and you’ll see it: a photo that looks like a collectible figurine on a desk, clear acrylic base, toy-box packaging in the background, even a modeling app open on a monitor. It looks hand-made. It probably took 10–20 seconds. That’s the hook behind the community trend people are calling Gemini Nano Banana—a nickname for prompt recipes that use Google’s Gemini image-generation inside AI Studio to turn everyday photos into 3D-look anime and movie-style figurines.
To be clear, this isn’t a new, official Google model. “Nano Banana” is a label the internet slapped onto a style of prompting that reliably produces figurine-like renders: small scale, acrylic base, studio-style lighting, and a desk or shelf scene that sells the illusion of a real product shot. What’s new is how simple it’s become. Instead of mastering a 3D tool like Blender or ZBrush, people upload a reference image, describe the figurine they want, and get an image that looks like a photo of a finished collectible.
That “looks” part matters. Most of what’s going viral are 2D images styled to look like 3D objects photographed in the real world. Some creators stop there and post. Others take it further—running separate 3D reconstruction tools to generate meshes for 3D printing or animation. The point is: the figurine effect is achievable without a 3D skillset, and that’s why it’s spreading so fast on Instagram and TikTok.
Under the hood, the heavy lifting comes from Gemini’s latest image generation capability (exposed in Google AI Studio), which responds well to long, specific prompts and visual references. The model leans into product photography tropes—clean acrylic bases, soft edge lighting, desk clutter, even “packaging design” in the background—to trick your brain into reading the render as a real object. It’s clever prompt engineering, not a hidden CAD pipeline.
If you’ve tried text-to-image tools before and found them fussy or slow, this feels different. You can start with a selfie, a pet photo, or a full-body portrait and get a clean “toy” in a believable environment. The speed and repeatability are what make it feel like a new kind of creative shortcut.
How to make your own figurine-style images (and do it safely)
You don’t need special software. The workflow sits inside Google AI Studio’s Gemini interface. Think of it as three stages: prep your input photo, write a precise prompt, and iterate until the lighting, pose, and base all look right.
Here’s a practical walkthrough:
Prep a good reference image
- Use a clear, well-lit photo. Include the full subject if you want a full-body figurine.
- Neutral backgrounds help. Busy patterns can confuse edges, props, and hair.
- If you’re aiming for a stylized figurine (anime, superhero, sci‑fi), note the key details you want to keep: outfit, colors, accessories, props.
Open Gemini image generation in AI Studio
- Select the image generation option. Upload your reference photo as the “source” for the character likeness and attire.
- You’ll drive the rest with text prompts. Keep your prompt in simple, descriptive language.
Use a structured prompt
- State the scene, the scale, the materials, and where the figurine sits. Include the “acrylic base” detail and the environment (like a computer desk) to anchor realism.
- Ask for a realistic lens and lighting. Product-photo cues reduce weird shadows and plastic-looking skin.
- If you don’t want text in the image, say so (for example, “no visible text on the base or box”).
Generate, review, and iterate
- If the base is missing or tilted, nudge your prompt: “round transparent acrylic base, centered, seen clearly from above.”
- If the face isn’t you, increase likeness guidance: “match the uploaded person’s face and hair exactly.”
- If hands look odd, limit hand poses: “hands relaxed at sides” or “arms crossed, fingers hidden.”
Want a reliable starting template? Try this and tweak the specifics:
“Create a 1/6 scale commercial figurine of the person in the uploaded photo. Realistic product-photography style. The figurine stands on a round, transparent acrylic base with no text. Scene: a real computer desk with soft daylight. On the monitor, show a generic 3D sculpting interface (no logos). Next to it, a toy-style packaging box with flat illustrated art of the same character (no brand names, no readable text). Keep the likeness, outfit, and hair from the reference photo. Clean background, sharp focus, studio lighting.”
Variations for different styles:
- Anime look: “Anime-styled head and eyes, cel-shaded textures, pastel palette, slight chibi proportions, glossy acrylic base.”
- Movie hero: “Cinematic realism, subtle weathering on costume, dramatic rim light, shallow depth of field, acrylic base.”
- Game character: “Stylized PBR textures, slight exaggeration of armor and props, desk scene, acrylic base, neutral packaging design.”
- Pets as figures: “Designer toy style, vinyl-like finish, cute proportions, pet’s colors and markings preserved, small acrylic base.”
Tips that improve consistency:
- Say the scale: “1/6 scale” or “1/10 scale.” It helps the model decide proportions and camera distance.
- Lock the base: “round transparent acrylic base, clean edges, no text, centered on the desk.”
- Define the lens: “50mm product lens, studio softbox lighting.”
- Control clothing: “Keep the same jacket and sneakers as the reference,” or “swap to a fantasy cloak and leather boots.”
- Limit text: “no readable text anywhere” reduces random labels on screens and boxes.
What this tech can—and can’t—do
- It creates 2D images that convincingly look like photos of 3D figurines. You don’t get a printable 3D mesh by default.
- For real 3D: you’ll need an extra step with a 3D reconstruction tool or manual modeling. Expect cleanup.
- Faces and hands are better than they used to be, but not perfect. Poses that hide fingers usually look cleaner.
- Logos and brand names are unpredictable. If you mention real brands, you might get warped or partially censored text.
- Lighting matters. If your reference photo is dim or blurry, the figurine will usually look flat.
Common mistakes (and easy fixes)
- No base appears: Restate it and its position—“round transparent acrylic base, fully visible, under the feet.”
- It looks like a statue, not a figurine: Add “painted PVC/vinyl figure with subtle seams and joints” or “toy-like finish.”
- The character drifts from your likeness: Say “match the uploaded face exactly; preserve hair style and color.”
- Background is chaotic: Ask for a “simple desk setup, soft daylight, uncluttered background.”
- Unwanted text or logos: Include “no readable text anywhere” and avoid naming real brands.
Speed, access, and cost
The experience in AI Studio is quick—often seconds per render—though actual speeds vary with model load and account limits. You work in a browser; there’s nothing to install. If you’re generating a batch (multiple outfits, poses, or styles), queue iterations and save your best prompt as a reusable template. You’ll get more consistent results with small, targeted edits than with wholesale rewrites.
Safety, privacy, and legal guardrails
- Likeness rights: Stick to photos you own or have permission to use. Turning someone else into a “figurine” without consent can cross legal and ethical lines, especially if the result is commercialized.
- Brands and packaging: Prompting “Bandai-style” or name-dropping real toy brands can generate trademark-like boxes. That’s fine for personal play, but don’t market, sell, or imply endorsement.
- Copyrighted characters: Generating lookalikes of protected IP is risky. If you plan to monetize, design original characters or use licensed assets.
- Minors: Avoid posting realistic figurines of children. Even harmless “toy” aesthetics can be misused online. If you’re a parent, crop faces or use stylized, non-identifiable versions.
- Data handling: You’re uploading images of yourself or others. Review the platform’s data policies and retention settings before you start, and delete uploads you don’t plan to keep.
From hobby posts to prototyping
Why are toy-like renders so sticky? They bridge fandom, personalization, and product photography. Cosplayers can preview how a costume might translate into a collectible. Indie artists can test packaging aesthetics. Streamers and athletes can spin up limited-edition “mini” versions of themselves to drum up hype. None of that required a 3D pipeline a year ago. Now, it’s a prompt and a few retries.
That doesn’t replace professional 3D. If you want a real figurine, you still need engineering: tolerances, materials, paint maps, and assembly planning. But for mood boards and first-pass visuals, this gets you to “see it on a desk” faster than a traditional concepting sprint. It’s a new kind of pre-viz for consumer objects, powered by general-purpose image generation and a pinch of social-media theater.
How creators push beyond the default look
- Advanced lighting: Ask for “mixed light sources—window daylight plus warm desk lamp—soft reflections on acrylic.”
- Micro details: “Subtle paint wear on boots, tiny seam lines at shoulders, matte skin with soft specular highlights.”
- Pose control: “Dynamic mid-turn pose, weight on one leg, cape sweeping left, base visible.”
- Camera craft: “Low-angle shot as if photographed on a desk, 50mm lens, shallow depth of field.”
- Material realism: “Painted PVC/vinyl finish with slight plastic sheen; acrylic base with faint edge refraction.”
If you do want a real 3D model later
- Use multiple AI images at consistent angles (front, side, three-quarter) as references.
- Feed those into a 3D reconstruction tool to get a rough mesh, then retopologize and clean in a 3D app.
- Expect to repaint textures. The “toy” look often relies on baked lighting that won’t transfer to a neutral 3D scene.
Why the “desk scene” trick works
The desk anchors scale and context—keyboard, monitor, coffee mug. The acrylic base signals “collectible,” not “random statue.” Packaging in the background adds “this is a product” without needing sharp logos. Those cues train the model and your eyes. The result reads as a photograph of an object that sits in the real world. That illusion is the heart of the trend.
A note on comparisons
You can build similar “toy shot” aesthetics in other image models with the right prompts and references. What’s making this particular recipe pop is the combination of ease (upload, describe, go), strong adherence to reference photos, and the meme-able output format. Whether you’re team anime, hyperreal, or painterly, the figurine setup gives you a compact way to showcase a look without complex scenes.
Quick checklist before you post
- Does the likeness match your intent? If not, iterate with “match face and hair exactly.”
- Is the base visible and round? If not, restate its shape and position.
- Any stray text? Add “no readable text anywhere.”
- Clean edges around hair and fingers? If not, try a cleaner reference or a simpler pose.
- Comfortable sharing? Remember you’re posting your likeness. Crop or stylize if you want more privacy.
The bigger picture
Creative AI keeps sneaking into places that used to demand specialized training. A year ago, a realistic figurine photo was a mini production: model sculpt, print, prime, paint, light, shoot. Now you can explore the look in a lunch break. That doesn’t devalue the craft; it widens the on-ramp, and it changes who gets to experiment. Expect more niche “prompt recipes” like Nano Banana to surface across hobbies—sneaker mockups, skateboard decks, vinyl record sleeves—where the vibe of a finished product sells the idea long before a real prototype exists.
If you’re jumping in today, keep it simple. Use a sharp reference image. State the scale, the base, and the desk scene. Lock your lens and lighting. Iterate, don’t overhaul. And if you decide to turn that “toy photo” into a real product, bring a 3D artist into the loop. The shortcut gets you the vision; the craft gets you the object.